How to Replace an Already Installed Floor Drain

Floor channels may create issues such as moderate seepage, odor backflow, or maturing after drawn out utilize, influencing the typical work of the lavatory. Indeed if the deplete is as of now introduced, it can still be supplanted utilizing legitimate strategies. Knowing the redress substitution steps not as it were moves forward execution but too makes a difference maintain a strategic distance from harming the waterproofing layer and floor structure.

Prepare Instruments and Materials

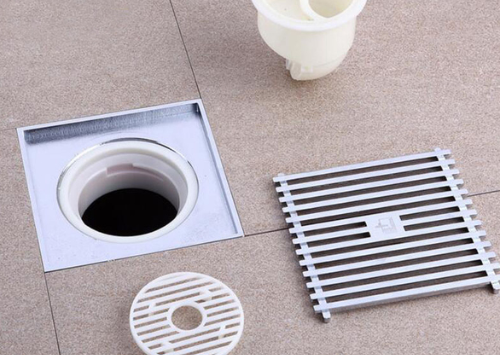
Before supplanting the deplete, assemble vital apparatuses counting a torque, screwdriver, point processor or chisel, waterproof sealant, cement mortar, and the modern deplete. Make beyond any doubt the modern drain’s estimate and association sort coordinate the existing pipe. Turn off the water supply and deplete any standing water in the channels to get ready for the job.

Remove the Ancient Deplete

First, evacuate the deplete cover and assess how it is secured. If it is held by a nut or clip, it can be unscrewed or segregated straightforwardly. If fixed with cement or cement, carefully cut around the edge utilizing a cutting instrument and steadily partitioned the deplete from the encompassing floor, taking care not to harm the deplete pipe or adjacent tiles.

Clean the Establishment Region

After expelling the ancient deplete, completely clean out any remaining cement, cement, or flotsam and jetsam to guarantee the opening is clean and smooth. Review the deplete pipe for blockages, harm, or buildup. Clear or repair as required to guarantee appropriate fixing and proficient waste with the modern unit.

Install the Unused Deplete

Place the modern deplete into the opening and alter its tallness so the best is flush with the floor surface. Secure the edges with waterproof sealant or cement mortar to anticipate spills. For water-sealed models, amass the inside trap agreeing to enlightening to guarantee viable odor prevention.

Summary:Replacing an already-installed floor deplete includes dismantling and resealing, but with the right devices and cautious execution, it can be completed effectively on your claim. The key steps are cautious expulsion, intensive cleaning, and a secure, watertight seal. After establishment, perform a water test to affirm there are no spills and that water channels easily some time recently continuing normal utilize.

Is a Smelly Bathroom Caused by the Floor Drain or the Toilet

If your washroom has an repulsive odor, is it caused by the floor deplete or the can? To illuminate the issue successfully, we require to recognize the source first.

Is the washroom scent due to the floor deplete or the toilet?

1. Unsavory odors in the lavatory may stem from either a clogged floor deplete or odor backflow from the latrine, so both causes are conceivable. You can review and kill each plausibility one by one. Floor channels are especially inclined to odor issues, which may be due to destitute anti-odor execution or lacking upkeep, driving to disappointment of the seal function.

2. To begin with, check whether the floor deplete is reasonable. There are two primary sorts: water-sealed and dry-sealed. Water-sealed channels have a more complex structure and slower seepage, but offer way better odor anticipation. They require standard water refilling amid utilize to keep up the water seal.

3. If issues are found, supplant the deplete expeditiously. If the waste pipe is blocked, clear the blockage to begin with, at that point reinstall the deplete and guarantee great fixing around it. After drying the zone, apply sealant or silicone to guarantee no odor can escape.

4. If the scent comes from the can, it seem be due to a clogged deplete pipe, moderate squander stream caused by latrine repositioning, or debased fixing at the latrine base—all of which can lead to odor backflow.

What to do if the washroom has an odor?

1. If there is a awful scent, open windows to ventilate. If there is no window, turn on the debilitate fan to quicken discuss circulation.

2. You can too put lemons or vinegar in the washroom to offer assistance dispose of odors. In any case, these ought to be supplanted frequently, such as once a week. Note that this strategy may as it were cover the scent or maybe than fathom the root cause.

3. If the can or floor deplete is clogged, the odor will decline. The most viable arrangement is to clear the blockage to anticipate odor backflow from the can or drain.

Editor’s Rundown:When utilizing toilets or floor channels, pay consideration to keeping up great fixing and dodge clogs to avoid odor issues. Moreover, clean the lavatory frequently and keep up a dry, clean environment.

How to Fix the EP Error on a Wall-Mounted Boiler

Wall-mounted boilers give amazing warming execution, but over time, different deficiencies may happen. Underneath, we’ll clarify how to resolve the “EP” mistake shown on a wall-mounted boiler.

How to Resolve the EP Blunder on a Wall-Mounted Boiler:

The “EP” mistake on a wall-mounted evaporator demonstrates that the warming framework is not identifying water stream. This issue is generally simple to address. To begin with, check whether the boiler’s warming supply and return water valves are completely open. Following, review the boiler’s channel for blockages and guarantee the pump is working legitimately. After clearing any hindrances in the channels, check the warming system’s water stream switch.

Wall-Mounted Boiler Maintenance Tips: Essential Cleaning and Care Guidelines:

1. Outside Cleaning

Since the outside of a wall-mounted kettle tends to collect tidy, clean it frequently utilizing a delicate cloth. Then again, utilize a clean cover to ensure the kettle and anticipate clean buildup. As these units are frequently introduced in kitchens, provoke cleaning is basic when clean appears.

2. Customary Inner Cleaning

During hot water circulation, debasements can collect interior the kettle. If not expelled, these stores can ruin warm trade, decrease effectiveness, abbreviate the boiler’s life expectancy, and cause intemperate pump weight. Hence, intermittent inside cleaning is vital to expand the boiler’s benefit life.

3. Keep up Full Water Weight Amid Maintenance

The water in a wall-mounted boiler’s warming framework does not trade with outside water. Subsequently, amid support, it is best to keep the framework completely filled with water. This diminishes the oxygen substance interior the channels, minimizing oxygen erosion and making a difference to amplify the boiler’s lifespan.

4. Opportune Scale Removal

Scale buildup in a wall-mounted evaporator decreases warm proficiency. This is particularly common in zones with difficult water, where scale shapes more effortlessly, influencing both warming execution and life span. Scale ought to be expelled expeditiously. When cleaning, guarantee the water temperature does not surpass 65°C, as higher temperatures advance encourage scale formation.

Summary:This article has secured how to resolve the “EP” mistake on a wall-mounted kettle. We trust this data is accommodating. For more related information, feel free to take after our site overhauls.

How Do Pressure-Boosting Showerheads Work? Understanding the Technology Behind T

Numerous family units nowadays are introducing pressure-boosting showerheads in their washrooms. These showerheads are prevalent not as it were for their water-saving capabilities but moreover for their capacity to profoundly cleanse skin pores, help in skin recuperation, and give a rubbing impact that invigorates acupressure focuses to soothe weariness. Their prevalent cleaning execution has made them profoundly favored in cutting edge homes. But how do pressure-boosting showerheads really work?

How Do Pressure-Boosting Showerheads Work:

Pressure-boosting showerheads upgrade water stream through different plan methods. One strategy diminishes the number of water outlets, expanding water weight but diminishing scope and consolation. Another limits the outlet gaps, making needle-like streams that may feel sharp or awkward on the skin. A third strategy includes including discuss admissions gaps, permitting encompassing discuss to blend with the water, breaking the ceaseless stream into beads, in this manner making a seen weight boost.

How to Select a Pressure-Boosting Showerhead:

1. Check the Water Stream Execution

There are numerous styles of pressure-boosting showerheads on the advertise, making determination challenging. When choosing, watch the water stream design. Test the showerhead at a tilted point to assess the execution of the best shower gaps. If the stream essentially debilitates or stops, the inside plan may be destitute, driving to diminished shower comfort.

2. Look at the Embellishments

The quality of showerhead embellishments straightforwardly influences shower consolation. Pay consideration to points of interest such as the smoothness of the height-adjustable bar and whether it incorporates a revolution control mechanism.

3. Review the Plating and Cartridge

The surface wrap up is a coordinate pointer of construct quality. A shinning, smooth surface ordinarily demonstrates great plating craftsmanship. The cartridge is moreover crucial—opt for models with imported ceramic cartridges, known for their tall hardness and durability.

Editor’s Rundown:The over data clarifies the working standards of pressure-boosting showerheads. We trust this substance gives supportive experiences. For more related information, feel free to visit our site for encourage meeting.

What Does “Zero Cold Water” Mean for Gas Water Heaters

When selecting a gas water radiator, you may come over the term “zero-cold-water” include, which can be befuddling to numerous. Let’s investigate what this means.

What Does Zero-Cold-Water Cruel in Gas Water Radiators:

The zero-cold-water work alludes to a framework that recirculates the cold water remaining in the channels back to the water radiator utilizing a return pump. This remaining cold water is warmed, so when you turn on the tap, hot water comes out promptly without the normal hold up. This dispenses with the require to deplete cold water to begin with, upgrading comfort and consolation for users.

How Gas Water Radiators Work:

1.Fundamental Working Rule

Gas water radiators work by burning gas to create warm, which is at that point exchanged to the streaming water through a warm exchanger. As water passes through, it assimilates the warm and gets to be hot water.

2.Warming Prepare

After start, the burner warms the warm exchanger, which in turn warms the water. Hot water is conveyed nearly right away, giving on-demand heating.

3.Temperature Soundness

The yield water temperature is impacted by water stream rate and warm trade proficiency. In this manner, exact temperature control is vital. More seasoned models may battle with steady temperature regulation.

4.Progressed Temperature Control

Thanks to innovative headways, cutting edge constant-temperature gas water radiators are presently common. They can keep up water temperature inside a contract extend of ±0.5°C, guaranteeing a steady and comfortable shower involvement without discernible fluctuations.

5.Security Highlights

During combustion, gas water radiators expend oxygen and posture potential dangers. To address this, present day units are prepared with complex security components, counting fire disappointment assurance, overpressure assurance, carbon monoxide discovery, and anti-freeze functions.

Editor’s Outline:This concludes our clarification of the zero-cold-water include in gas water radiators. We trust this data has been supportive. For more related information, feel free to visit our site for overhauls.

Can You Install a Booster Pump on an Electric Water Heater? – What You Need to K

When utilizing an electric water radiator, if the water weight is deficiently, you may require to introduce a booster pump. Underneath, we’ll clarify whether it’s conceivable to introduce a booster pump with an electric water heater.

Can you introduce a booster pump with an electric water heater?

If your domestic has moo water weight, introducing a booster pump is a practical arrangement. The pump must be introduced specifically on the water supply line to be viable. Introducing it in the off-base area will render it futile. It’s too suggested to prepare the booster pump with a switch. In zones with especially moo water supply, you may require to physically enact the pump utilizing the switch to constrain it to start.

What ought to you pay consideration to when utilizing an electric water heater?

1. Dodge utilizing handwheel-type valves

When utilizing an electric water radiator, it’s superior to utilize lever-style valves for the water supply instep of handwheel-type valves. Handwheel valves are more inclined to coincidental closure, which seem lead to the water radiator running dry and causing genuine damage.

2. Turn off control amid water blackout

If your domestic encounters a water blackout, instantly turn off the control to the water radiator to avoid dry warming and potential harm. Moreover, guarantee the water channel is not as well contract, and maintain a strategic distance from setting the water temperature as well high—generally, 60°C is adequate for family washing needs. This avoids overheating and potential distortion of the gulf components.

3. Open cold water to begin with

When utilizing the water radiator, continuously turn on the cold water to begin with, at that point blend in hot water. This makes a difference anticipate singing. For storage-type water radiators, make beyond any doubt the tank is completely filled with water some time recently turning on the control. Furthermore, supplant the magnesium anode bar frequently to anticipate intemperate buildup of debasements, which can increment power utilization and contrarily influence skin wellbeing amid showers.

4. Keep up water temperature in winter

When utilizing the water radiator in winter, take anti-freezing measures. In cold climate, guarantee the radiator keeps up a certain temperature to anticipate solidifying and potential harm to the unit.

Summary:This article has clarified whether a booster pump can be introduced with an electric water radiator. If your domestic has moo water weight, introducing a booster pump is prescribed. It must be introduced accurately on the dynamic water supply line to work appropriately. Inaccurate situation will anticipate the pump from working as expecting.

Why Is My Wall-Mounted Boiler’s Hot Water Temperature Fluctuating? Common Causes

In winter, an expanding number of family units utilize gas wall-mounted boilers for warming and residential hot water. Amid utilize, a few clients take note that the hot water temperature vacillates between hot and cold. What causes this issue? Let’s discover out.

Why does the household hot water from a wall-mounted kettle vacillate in temperature?

1. Unsteady water weight: Wall-mounted boilers are prepared with a stream switch that screens the water stream entering the warm exchanger. If the water weight is unsteady, the kettle may cycle on and off amid operation, causing the water temperature to fluctuate.

2. Defective warming temperature sensor: The temperature sensor screens the status of the residential hot water in genuine time. If the sensor breakdowns, it can influence the fundamental control board’s capacity to keep up a steady water temperature.

How to make a wall-mounted kettle more gas-efficient?

1. Progress domestic cover: Whether utilizing radiators or underfloor warming, destitute separator causes critical warm misfortune to the exterior and draws in cold discuss from outside, decreasing vitality efficiency.

2. Keep up appropriate indoor temperatures for predominant imperativeness speculation reserves. Tentatively manage room temperature—ideally 20°C in the midst of the day and 15–17°C at night. Since the evaporator runs diligently in winter, keep up a vital separate from setting as well much tall temperatures. Change the boiler’s outlet water temperature based on climate conditions: higher in colder climate, lower when it’s milder. Utilize a greater temperature differential to trigger warming in more smoking conditions and a smaller one in colder conditions.

3. Numerous individuals turn the kettle to tall control upon returning domestic for quick warming. This is wasteful and expends over the top vitality. Instep, essentially lower the temperature setting when clearing out home.

4. When going out, set the boiler’s indoor regulator to around 5°C. This keeps the indoor temperature between 8–14°C. Upon returning, alter the warming setting to your craved temperature, which spares vitality and permits quicker warming.

Summary:This article clarifies the causes of fluctuating hot water temperatures in wall-mounted boilers and gives tips for making strides gas proficiency. We trust this data is accommodating. For more substance, feel free to proceed going by our site.

How to Take Apart a Showerhead

After long-term utilize, showerheads can amass mineral stores, driving to diminished water stream or clogged spouts, which influences shower consolation. Standard dismantling and cleaning are basic to keep up ideal execution. Knowing the adjust way to evacuate a showerhead not as it were makes a difference expel buildup but moreover plans you for supplanting the hose or overhauling the installation. The handle is basic, and with the right steps, most clients can total it on their own.

Turn off the water supply for safety

Before beginning, make beyond any doubt to closed off the water supply valve, ordinarily found in the lavatory corner or close the water radiator. At that point, turn on the shower to discharge any remaining water in the channels. This anticipates spills and damp floors amid dismantling and is a significant to begin with step for safety.

Remove the showerhead

Hold the showerhead and turn it counterclockwise by hand to unscrew it from the hose. If it’s stuck due to limescale, wrap a dry cloth around it to make strides grasp or utilize a torque delicately to help. Be cautious not to scratch or harm the surface finish.

Detach the interfacing hose

Use a torque to grasp the metal connector where the hose connects to the divider gulf, at that point turn it counterclockwise to expel the hose. Move carefully to maintain a strategic distance from harming the channels interior the divider. If the hose is split or worn, consider supplanting it at the same time.

Remove the shower arm bracket

Most shower brackets are secured to the divider with screws. Utilize a screwdriver to expel the screws and take down the bracket. For flexible brackets, you may require to release the locking handle some time recently evacuation. After expulsion, clean any gathered grime from the mounting area.

Summary:Expelling a showerhead is a basic and commonsense domestic upkeep expertise. By taking after legitimate strategies, you can successfully clean components and distinguish potential issues. It is prescribed to clean and review the showerhead each six months to guarantee smooth water stream, expand its life expectancy, and appreciate a more comfortable and unwinding shower encounter.

What to Do If the Small Round Drain Cover Falls into Your Bathroom Drain

It’s common amid lavatory utilize to inadvertently drop the little circular cover of the floor deplete into the drainpipe, which can be very unforeseen. In spite of the fact that this little portion may appear inconsequential, once it falls, it can influence waste, cause flotsam and jetsam buildup, and indeed lead to clogs. When this happens, there’s no require to freeze. Knowing the right steps to take can viably resolve the issue and anticipate encourage complications.

Stop utilizing water immediately

Once you realize the little cover has fallen into the deplete, the to begin with step is to halt utilizing any water in the washroom, counting handwashing and showering. This avoids the water stream from pushing the cover more profound into the channels, making recovery more troublesome, and makes a difference maintain a strategic distance from water pooling on the floor due to destitute drainage.

Try to recover it manually

If the deplete opening is shallow and the cover is still obvious, attempt utilizing long-handled tweezers, forceps, or a snared instrument to carefully drag it out. Move gradually and delicately to maintain a strategic distance from pushing the cover assist down. Wear gloves for cleanliness and guarantee the apparatus has a firm hold to avoid slipping.

Use a plunger or vacuum tool

If manual recovery falls flat, attempt utilizing a little plunger or the contract spout of a family vacuum cleaner. Press the spout firmly against the deplete opening and utilize suction to endeavor to drag the cover out. This strategy works best if the cover hasn’t ended up completely lodged.

Remove the deplete for retrieval

When the over strategies do not work, consider dismantling the deplete unit. Utilize a screwdriver or torque to evacuate the external outline of the deplete and get to the pipe straightforwardly to recover the cover. If you’re not experienced with plumbing, it’s best to call a proficient to maintain a strategic distance from harming the pipe system.

Summary:In spite of the fact that dropping the little cover may appear minor, dishonorable taking care of can lead to clogs or odors. Provoke and legitimate action—or looking for proficient help—can avoid future issues. Routinely check that all deplete components are secure to anticipate this from happening once more.

Effective Solutions for Repairing Gaps in Hardwood Flooring

over the years, irrespective of how cautiously you protect your hardwood floors, gaps in the floorboards will unavoidably seem. that is in most cases because of the herbal properties of timber. So, how will you repair the growing gaps in hardwood flooring?

1. Filling the Gaps: Use floor Wax or wood Filler

For small and shallow gaps, you can use ground wax or wooden filler to fill within the spaces. First, clean the floor thoroughly to cast off particles and dust. Then, take the perfect amount of ground wax or timber filler and use a putty knife to flippantly unfold it inside the hole. allow it to dry and treatment for some time. once completely cured, sand the location with sandpaper to make sure it’s miles degree with the rest of the floor.

2. Addressing larger Gaps: wood Chip Insertion technique

If the gaps to your hardwood floor are larger, you can need to apply a technique referred to as the “timber chip insertion approach.” This requires you to choose timber chips from the equal kind of wood that carefully fits your floor. reduce and sand the chips as it should be to be able to snugly fit into the gaps. subsequent, practice an good enough amount of glue onto the wood chip and insert it into the gap. permit the glue to dry, then sand it right down to fit the floor’s surface, followed by applying a end to combination it seamlessly with the floor.

3. huge-Scale repairs: substitute or Refinishing

For substantial and critical gaps, you may want to replace or refinish the floors. This typically includes a bigger venture, as you will want to cast off the old ground, put together the surface, and installation new hardwood flooring. if you opt for refinishing, it normally consists of sanding the old hardwood ground, filling inside the gaps, and applying a new coat of end.

4. Prevention is key: proper upkeep and Use of the floor

no matter the restore solution you select, the maximum crucial factor of keeping hardwood flooring is prevention. whilst the use of hardwood flooring, it’s miles essential to monitor and manage humidity and temperature, retaining conditions within the comfort range for the timber to prevent immoderate expansion and contraction. ordinary cleansing and preservation also can indirectly amplify the lifespan of the flooring and reduce the likelihood of gaps performing. well using and preserving the ground will help maintain the natural beauty of the hardwood intact.

In precis, that is a short introduction to how to repair increasingly large gaps in hardwood flooring. via the dialogue above, irrespective of the troubles your hardwood ground can also come across, there’s continually a solution that will help you cope with the hassle. when faced with the mission of expanding gaps in hardwood flooring, with patience, the proper methods, and some gear, you may repair your floor to its unique splendor.